
After buying a new iPhone, the first step to take is activating your device and exploring its impressive features. The activation process is meant to be as seamless as possible, but that is not always the case. You may find out that the iPhone could not be activated because the activation information could not be obtained.
Don't allow this situation to get you distraught; there are various ways to fix the iPhone could not be activated because the activation information could not be obtained problems. Read this article to find out how.
Part 1 What Does It Mean When My iPhone Says It's Not Activated?
When your iPhone says it is not activated, it simply implies there is an issue with the Apple activation server. To get activated, your device must be connected to the server first. However, if the connection is unsuccessful because of a server issue, the phone will not be activated.
Another reason why this problem may occur could be due to the use of a faulty SIM card which hinders the activation process.
In addition, the activation lock, which is usually in place when the Find My Phone feature is activated, leads to this problem.
Part 2 How to Solve the Issue?
Some of the methods that can be applied in solving this problem include the following:
1. Wait and Try Again
The problem could be caused by just a glitch. Therefore, you need to give it some time and try again later. If you wait it out, and there is no difference, you can apply any of the other methods highlighted in this article.
2. Reinsert the SIM Card
As earlier stated, this problem can be caused by a faulty SIM card or a SIM card not properly installed. In such a situation, the solution may simply be reinserting the SIM card. To do this, simply remove the SIM card and reinsert it to see if this fixes the problem. If it doesn't work, you can try getting a new SIM.
3. Check Network Connection
You need a strong internet connection to activate an iPhone successfully. Check the connection's quality and switch between Wi-Fi and cellular data based on the connection's strength.
4. Check Apple System Status
If the iPhone could not be activated because the activation information could not be obtained from the device, check the Apple system status by going to the Apple System Status page and check the box next to iOS Device Activation. If the box is green, then the system is up and vice versa. If the system is not up, then it is best to try some other time again.
5. Unlock Activation Lock
The activation lock could be another reason why the iPhone could not be activated because the activation information could not be obtained from the device. This problem can be solved by unlocking the activation lock using the Apple ID and password. To do this:
- Browse iCloud.com and sign in with your Apple ID.
- Go to Find iPhone and choose All Devices at the top lane.
- Select the device that you want to remove from iCloud and click on Erase Device.
- Confirm your action to finish the process. After that, select Remove from Account.

If you do not have the Apple login details, you will need to visit an Apple Store with proof of ownership or previous ownership.
6. Activate via iTunes
This is another way to solve the iPhone could not be activated because the activation information could not be obtained from the device problems. Here are the steps for activating an iPhone with iTunes.
Step 1: Confirm that iTunes is in its latest version. Then, connect it to the computer.
Step 2: Turn on the phone, and iTunes will be automatically triggered to be activated.
Step 3: After the phone is detected, iTunes will automatically request the phone to be activated. The Apple ID will be requested to activate the iPhone.

If iTunes does not automatically activate the phone or you see some error message, then you should switch to the next method.
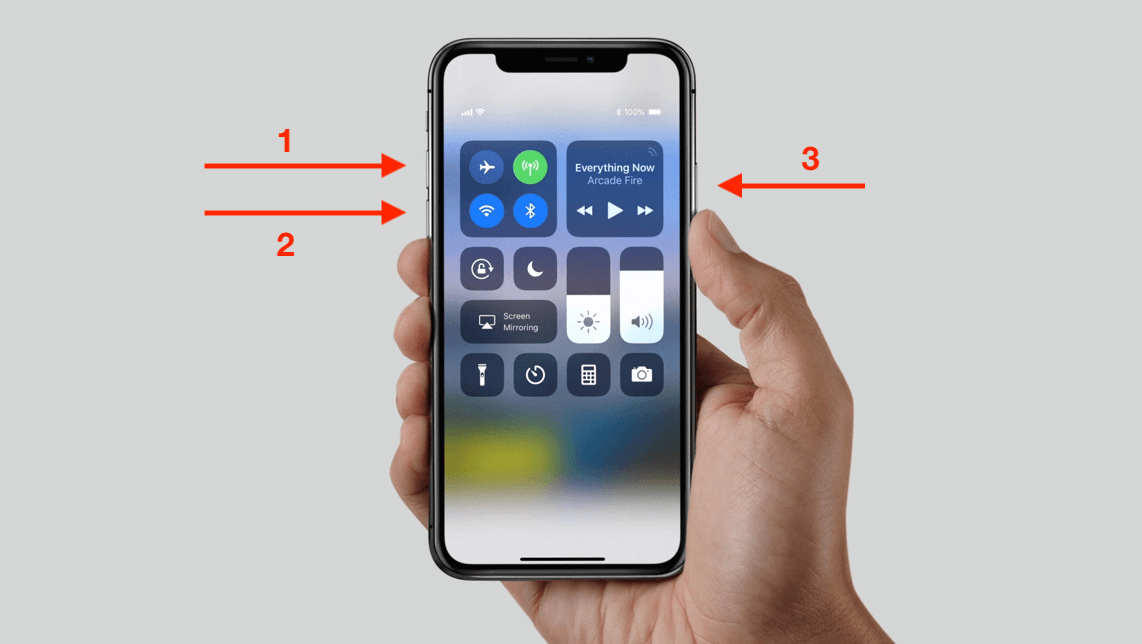
7. Force restart iPhone
Force restarting can always serve as a good method to fix this problem. Do note that the process of force starting iPhones differs according to the generation of the phone.
- For iPhone 8 or later models, quickly press and release the Volume Up button and then the Volume Down button. Finally press and hold the Side button until you see the Apple logo.
- For iPhone 7/7 Plus, press and hold the Volume Down button together with the Side button. Keep holding until you see the Apple logo.
- For iPhone 6 or earlier models, press and hold the Home button and Power button at the same time. Let the two buttons go when the Apple logo appears on the screen.


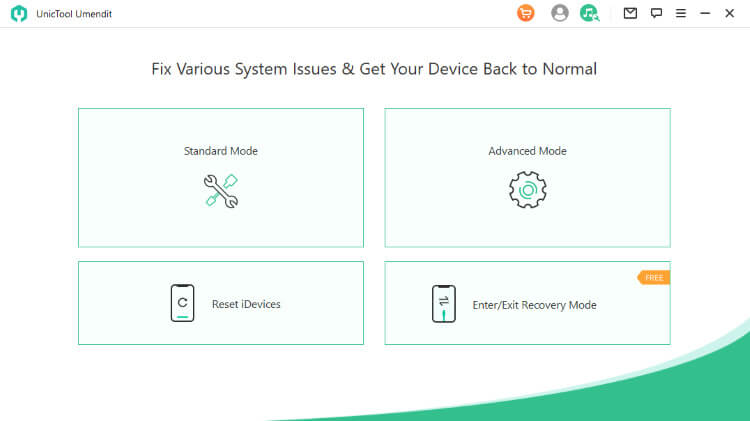
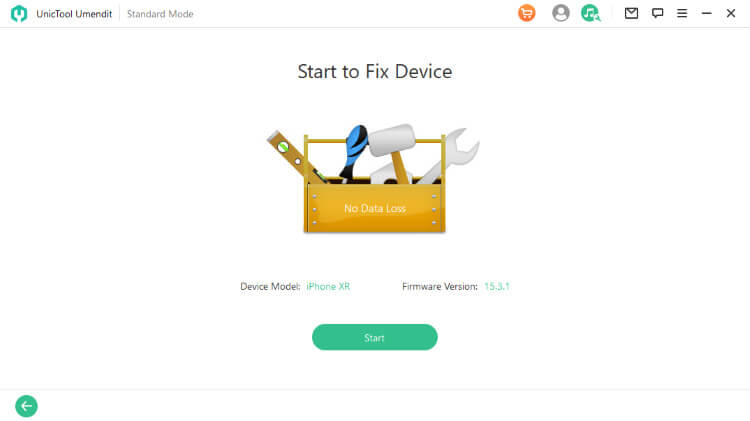
8. Use the All-in-One iOS Repair Tool: Umendit
When you meet some iOS problems like the iPhone could not be activated because the activation information could not be obtained, the best way is using a professional repair tool. That's Umendit, an effective tool for fixing all forms of iOS software issues. Advanced technology enables it to fix your iPhone/iPad/Apple TV with no data loss or malware attack. With Umendit, a wide range of issues can be fixed swiftly and efficiently. By the way, it is compatible with all iOS versions including the iOS 15. Here are detailed steps on how to use this amazing tool.
Secure Download
- 1 Download and launch Umendit on your computer. On the main interface, choose Standard Repair and connect your phone to the PC using a USB cord.
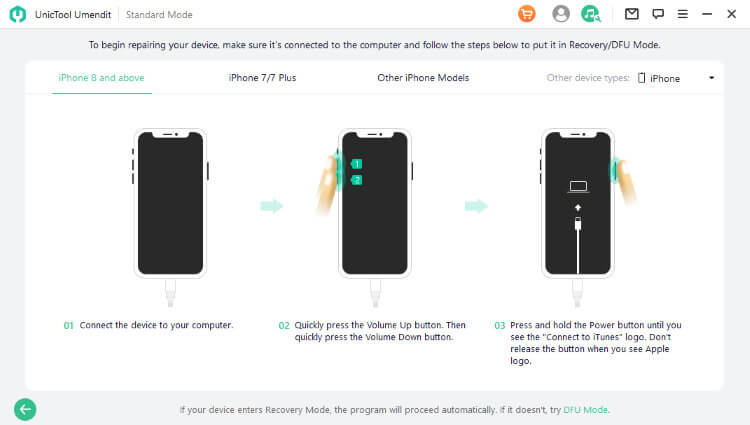
- 2 The program will detect the iPhone and prompt you to the next step. If not, you will be required to unlock the phone or put it in DFU or recovery mode. Do follow the instructions on your device to do it.
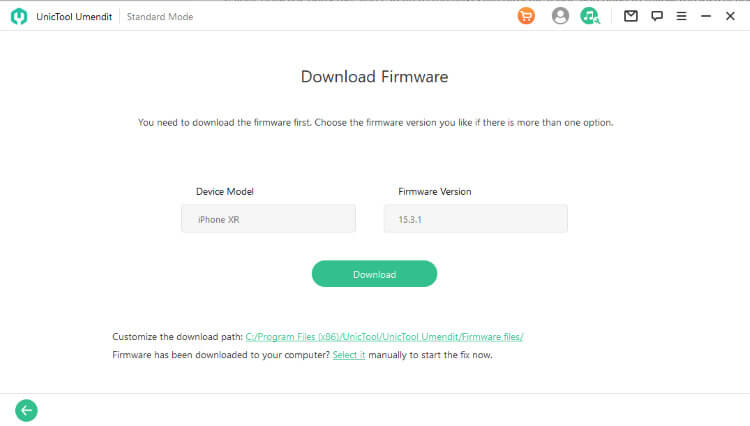
- 3 When Umendit recognizes your device, it will offer you all the compatible firmware for your iPhone. Choose the most suitable version for your device and click on Next button.
- 4 After that, choose Start button to begin the repair process. Ensure that your device remains plugged until the process has been completed. Wait for several minutes and your iPhone will return to normal and you can activate it as usual.
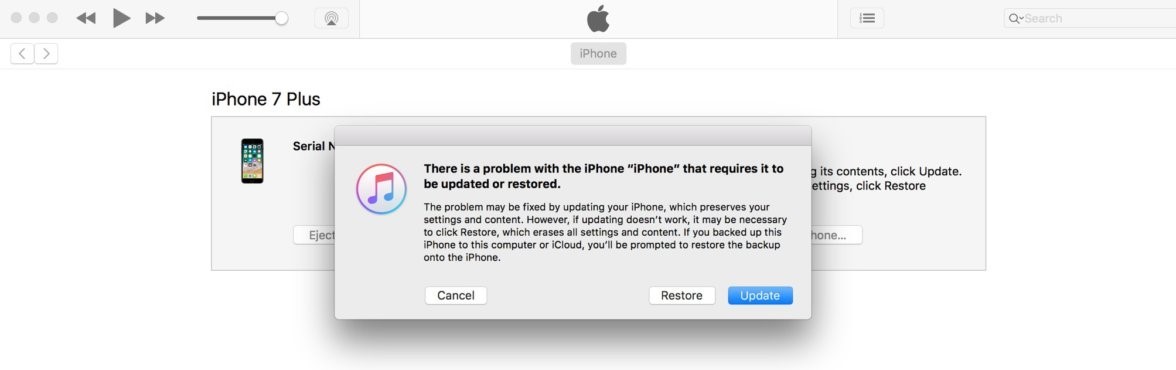
9. Update/Restore iPhone with Recovery Mode
If you have tried all the free methods above and got nothing, then you can try putting your iPhone in recovery mode and updating or restoring it. Please note that updating iPhone has a lower success rate while it will keep all your data safe. And the restore option has a high success rate, but it leads to data loss. Think carefully before you choose to update or restore your iPhone that could not be activated.
To do this, install the latest iTunes on your system. Then, connect your device to the computer with a USB cord and put your device in recovery mode by following the steps listed below.
- To put iPhone 8 or later models into recovery mode, press and release the Volume Up button, and then do the same for Volume Down button. Finally, press and hold the Side button until the recovery mode screen shows. Don't release the button when you see the Apple logo.
- To put iPhone 7/7 Plus into recovery mode, press and hold the Volume Down button together with the Side button. Keep holding till the recovery mode screen appears. Similarly, don't let the buttons go when the Apple logo shows.
- To put iPhone 6 or earlier models into recovery mode, press and hold the Home button and Side button at the same time. Release the buttons when you see the recovery mode screen. Keep holding when you see the Apple logo.
Then you will see the pop-up window with Update and Restore buttons, choose the one you want and confirm the action.
After restoration, you can try to activate the iPhone again to see whether the problem has been solved.
10. DFU Restoration Via iTunes/Finder
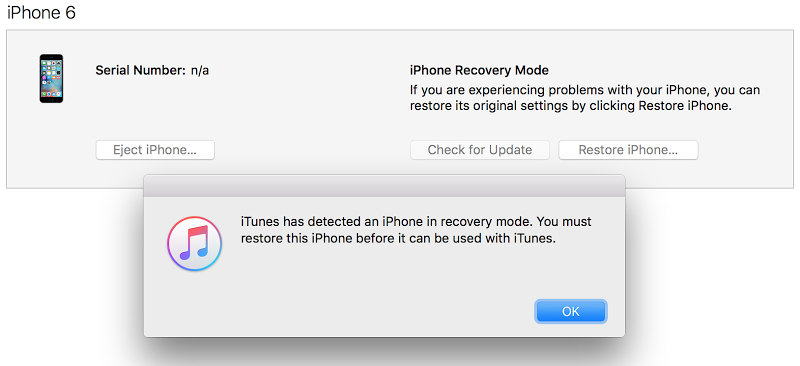
When it comes to the solution of common iOS issues, DFU restoration will appear as the last resort. And if your iPhone could not be activated because the activation information could not be obtained, you can give DFU restoration a try. You need to follow these steps below to put your iPhone into DFU mode first. Please note that you need to keep the device and PC connected during the whole process.
- For iPhone 8 or newer iPhone models: Quickly press the Volume Up button and then Volume Down button. Press and hold the Side button until the screen turns black. As soon as the screen goes black, press and hold the Volume Down button together with the Side Button for about 5 seconds. After 5 seconds, release the Side button but keep holding the Volume Down button for at least 5 seconds. And you will see a pop-up window on the iTunes saying that it has detected an iPhone in recovery mode.
- For iPhone 7/7 Plus: Press and hold the Volume Down button and Side button togther for 8-10 seconds. Then release the Side button but continue holding the Volume Down button for at least 5 seconds. Your iPhone screen will stay black and you can see the window on iTunes saying that it has detected an iPhone in recovery mode.
- For iPhone 6 or older models: Press and hold Home button and Side button together for 8-10 seconds. Release the Side button but continue holding the Home button for at least 5 seconds. After that, you can see a window on the iTunes saying that it has detected an iPhone in recovery mode.
Click OK and then choose Restore iPhone. Finally follow the prompts on the screen to finish the whole process.
Conclusion
This article introduces several methods for you to solve the issue "iPhone could not be activated because the activation information could not be obtained from the device". And you can choose any one from above to fix your iPhone and activate it normally. However, here the all-in-one iOS repair tool known as Umendit will be the best solution for you. This premium quality device ensures that you can solve all kinds of iOS/iPadOS/tvOS issues with a extremely high success rate. Why not download and give it a try?
Secure Download