Transferring files between an iPhone and a Mac is a common task for many users, as it allows for seamless synchronization of data, media, and documents across devices. The ability to easily transfer files between these devices can significantly enhance productivity and convenience, especially for those who rely on both platforms for work or personal use. In this article, we will explore various methods for transferring files between an iPhone and a Mac, including AirDrop, iCloud Drive, iTunes/Finder, and third-party applications like Dr.Fone - Phone Manager (iOS), AnyTrans for iOS, EaseUS MobiMover, and ChatMover. By understanding the different options available, users can choose the most suitable file transfer method for their needs and enjoy a smooth, hassle-free experience.
Part 1. Using AirDrop for file transfer
Part 2. File transfer using iCloud Drive
Part 3. File transfer with iTunes/Finder
Part 4. Third-party applications for file transfer
Part 5. Tips for efficient file transfer between iPhone and Mac
Part 1. Using AirDrop for file transfer
A. Introduction to AirDrop
AirDrop is a built-in feature on Apple devices, including iPhones and Macs, that allows users to wirelessly share files with other nearby Apple devices. This easy-to-use and efficient method requires no additional software, making it a popular choice for transferring files between iPhones and Macs.
B. Setting up AirDrop on iPhone and Mac
To use AirDrop, ensure that both devices have Wi-Fi and Bluetooth enabled and that they are in close proximity.
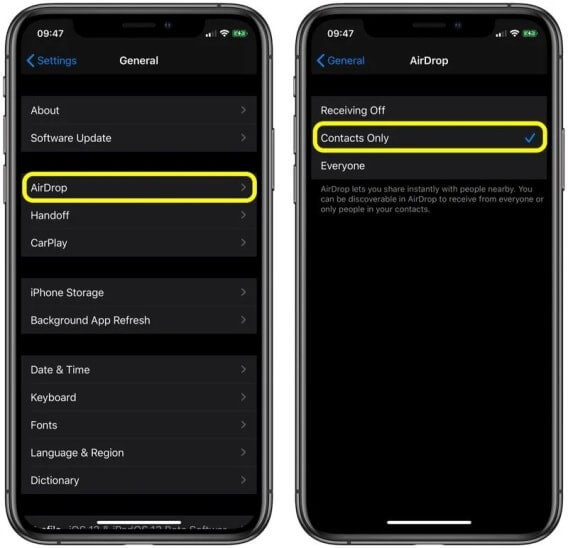
- 1. On your iPhone, go to Settings > General > AirDrop and select "Everyone" or "Contacts Only."
- 2. On your Mac, open Finder, and select "AirDrop" from the sidebar. Adjust the "Allow me to be discovered by" setting to "Everyone" or "Contacts Only."

C. Transferring files using AirDrop
Sending files from iPhone to Mac
- 1. Open the app containing the file you want to share (e.g., Photos, Notes, or Files).
- 2. Select the file and tap the Share icon.
- 3. Choose "AirDrop" and select your Mac from the list of devices.
- 4. On your Mac, accept the incoming file transfer. The file will be saved to your Downloads folder by default.

Sending files from Mac to iPhone
- 1. Locate the file you want to share on your Mac.
- 2. Right-click the file and select "Share" > "AirDrop."
- 3. Choose your iPhone from the list of devices.
- 4. On your iPhone, accept the incoming file transfer. The file will be saved in the appropriate app based on the file type (e.g., Photos for images, Files for documents).
D. Troubleshooting AirDrop issues
If you encounter difficulties using AirDrop, try the following steps:
- Ensure that both devices have Wi-Fi and Bluetooth enabled and are within close range.
- Confirm that both devices have the correct AirDrop settings (i.e., "Everyone" or "Contacts Only").
- Restart your iPhone and Mac and try the file transfer again.
- Update your devices to the latest iOS and macOS versions, as outdated software may cause compatibility issues.
Part 2. File transfer using iCloud Drive
A. Overview of iCloud Drive
iCloud Drive is Apple's cloud storage service, allowing users to store and access files across multiple devices, including iPhones and Macs. By utilizing iCloud Drive, you can easily transfer files between your iPhone and Mac, ensuring that your data is synchronized and up-to-date on both devices.
B. Setting up iCloud Drive on iPhone and Mac
To use iCloud Drive for file transfer, you need to enable it on both your iPhone and Mac and ensure that they are signed in with the same Apple ID.

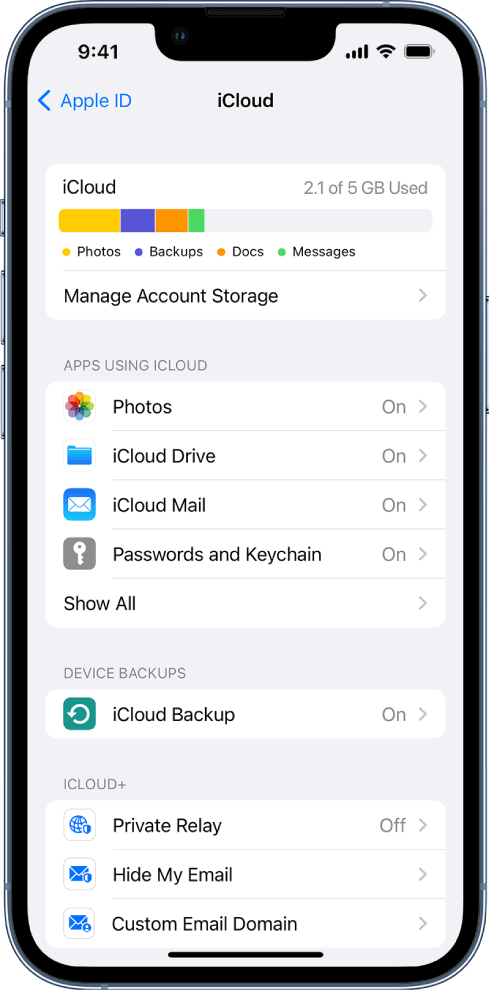
- On your iPhone, go to Settings > [Your Name] > iCloud and toggle on the "iCloud Drive" switch.
- On your Mac, go to System Preferences > Apple ID > iCloud and check the box next to "iCloud Drive."
C. Transferring files using iCloud Drive
1. Uploading files to iCloud Drive
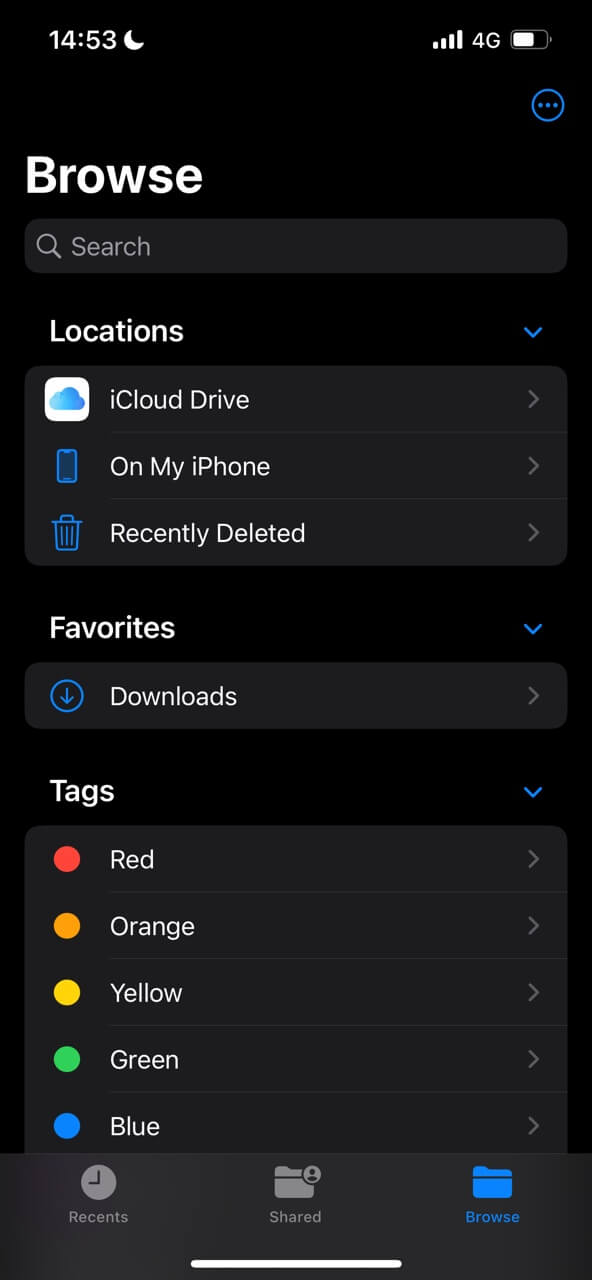
- From your iPhone, use the Files app to browse and upload files to iCloud Drive.
- From your Mac, open Finder and select "iCloud Drive" in the sidebar to add files to your iCloud Drive folder.

2. Accessing files on both devices
- On your iPhone, open the Files app and navigate to the "iCloud Drive" folder to access your files.
- On your Mac, open Finder and select "iCloud Drive" in the sidebar to view and access your files.
D. Managing storage and file organization in iCloud Drive
iCloud Drive offers free storage up to 5 GB, with additional storage available for purchase. To manage your iCloud storage space and organize your files:
- Regularly delete unnecessary files or move them to offline storage.
- Create folders and subfolders to keep your files organized and easy to locate.
- Monitor your iCloud storage usage and upgrade your storage plan if needed, by going to Settings > [Your Name] > iCloud > Manage Storage on your iPhone, or System Preferences > Apple ID > iCloud > Manage on your Mac.
Part 3. File transfer with iTunes/Finder
A. Overview of iTunes/Finder for file transfer
iTunes (for macOS Mojave and earlier) and Finder (for macOS Catalina and later) are built-in applications on Mac that allow users to manage and transfer files between their iPhone and Mac using a USB cable. This method provides a straightforward way to sync and back up data, including media files, documents, and app-specific files.

B. Connecting iPhone to Mac using a USB cable
To transfer files using iTunes/Finder, connect your iPhone to your Mac using a compatible USB cable. Ensure that you have the latest version of iTunes installed if you are using macOS Mojave or earlier.
C. Transferring files using iTunes/Finder
Syncing files and folders
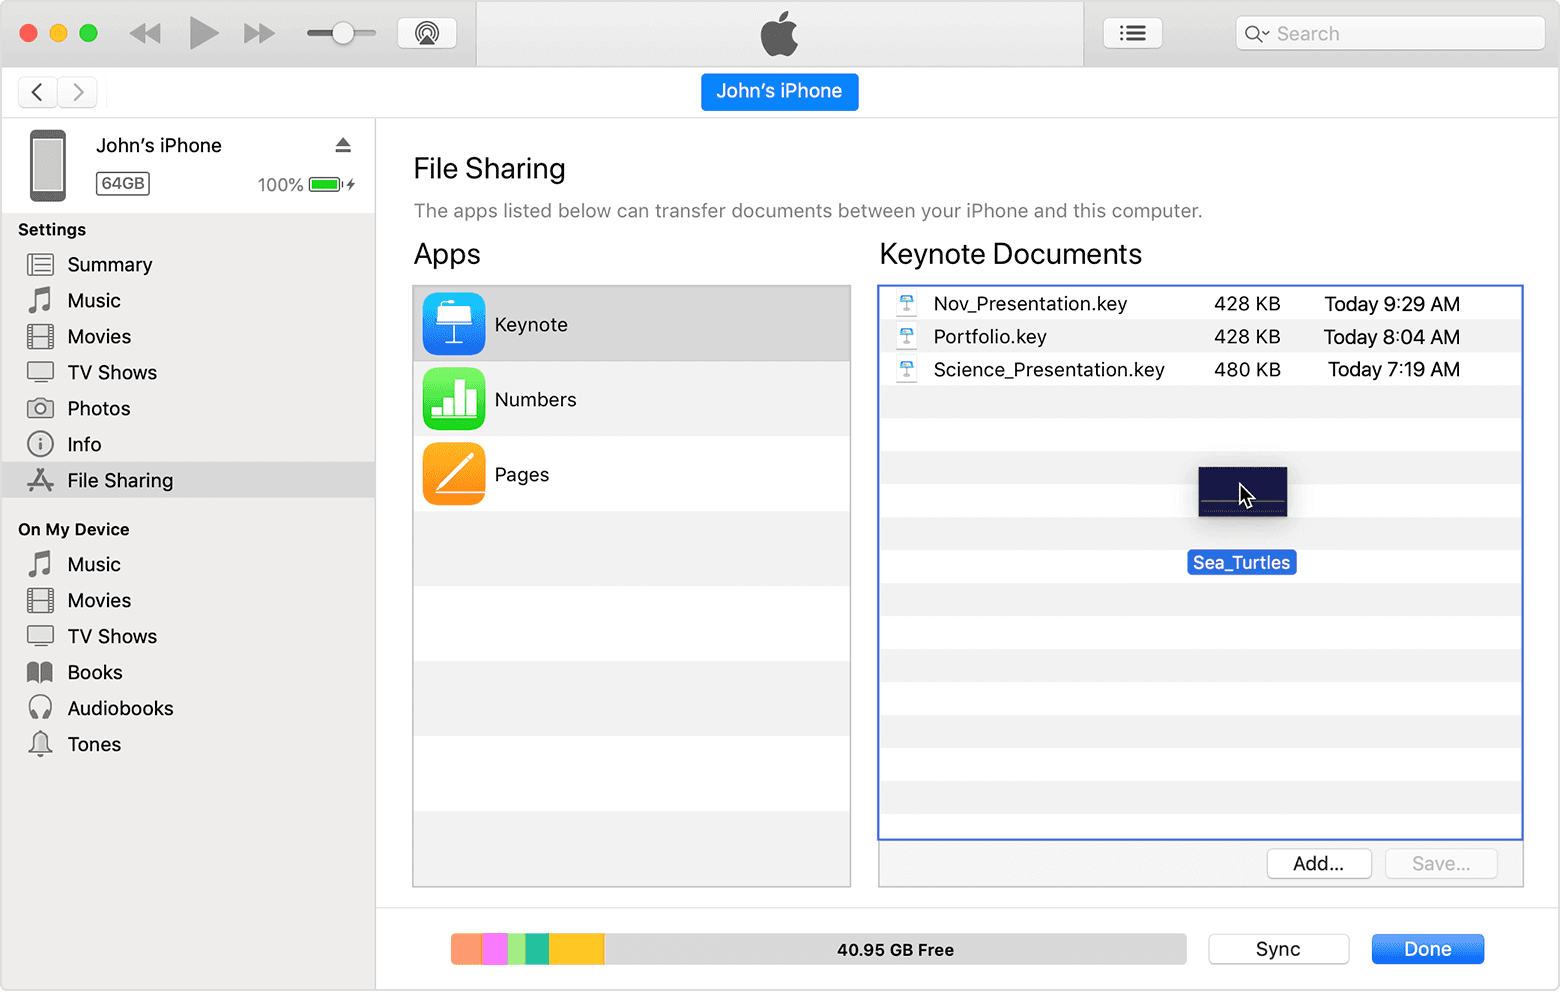
- 1. Open iTunes/Finder on your Mac and select your iPhone from the list of devices.
- 2. Choose the type of content you want to sync (e.g., Music, Movies, Photos, Books, or Files).
- 3. Check the box next to "Sync [content type]" and select the files or folders you want to sync.
- 4. Click "Apply" or "Sync" to initiate the file transfer.
Managing backups and device settings
- 1. In iTunes/Finder, select your iPhone from the list of devices.
- 2. Choose "Back Up Now" to create a backup of your iPhone's data on your Mac.
- 3. To restore a previous backup, select "Restore Backup" and choose the desired backup from the list.
- 4. Use the various tabs and options in iTunes/Finder to manage your iPhone's settings, such as updating iOS or configuring app-specific settings.
D. Troubleshooting iTunes/Finder issues
If you encounter difficulties using iTunes/Finder for file transfer, try the following steps:
- Ensure that your USB cable is properly connected and not damaged.
- Restart your iPhone and Mac and try the file transfer again.
- Update your Mac and iPhone to the latest macOS/iOS versions and install the latest version of iTunes if using macOS Mojave or earlier.
- Check your iPhone's storage space, as insufficient storage may cause sync or transfer issues.
Part 4. Third-party applications for file transfer
A. Introduction to third-party file transfer apps
Third-party file transfer applications offer alternative solutions for transferring files between iPhones and Macs. These transfer applications often provide additional features and capabilities that are not available through built-in Apple solutions, making them popular choices for users with specific file transfer needs.
B. Popular file transfer applications
- UnicTool ChatMover
- AnyTrans for iOS
- EaseUS MobiMover
- Dr.Fone - Phone Manager (iOS)
C. Comparing features, pricing, and ease of use
When selecting a third-party application for file transfer, consider the following factors:
UnicTool ChatMover

All-in-one WhatsApp Transfer
- Transfer WhatsApp from Android to iPhone without Data Loss
- Back up WhatsApp on Android & iPhone to computer free.
- Restore WhatsApp backup from Google Drive to iPhone.
- Export WhatsApp backup to HTML, PDF and CSV/XLS.
105,674 downloads
100% secure
- Features: Evaluate the capabilities of each application, such as supported file types, transfer speeds, and additional functionalities like backup and restore options or chat history migration.
- Pricing: Compare the costs of different applications, including free trial options and premium features. Some applications may require a one-time purchase, while others offer subscription-based plans.
- Ease of use: Choose an application that is user-friendly and has a straightforward setup process. Reading user reviews and watching tutorial videos can help you determine which app is best suited to your needs.
By carefully considering these factors, you can select a third-party file transfer application that meets your specific requirements and provides a seamless file transfer experience between your iPhone and Mac.
Part 5. Tips for efficient file transfer between iPhone and Mac
A. Organizing files for easy access
Keep your files well-organized on both devices by creating a consistent folder structure and naming conventions. This will make it easier to locate and manage your files during the transfer process.
B. Ensuring compatibility between file formats
When transferring files between iPhone and Mac, ensure that the file formats are compatible with the software on both devices. Some file types may require conversion before they can be opened on the other device.
C. Regularly backing up files and data
To safeguard your files and data, it's essential to perform regular backups. This can be done using built-in solutions like iCloud or iTunes/Finder, or third-party backup applications. Regular backups ensure that your data is protected in case of accidental deletion, device failure, or other unforeseen events.
Conclusion
There are multiple ways to transfer files between iPhones and Macs, including AirDrop, iCloud Drive, iTunes/Finder, and third-party applications like Dr.Fone - Phone Manager (iOS), AnyTrans for iOS, EaseUS MobiMover, and ChatMover. By understanding the various options available, users can choose the most suitable file transfer method based on their needs and preferences.
Seamless file transfer between iPhone and Mac is essential for maintaining productivity and convenience, as it allows users to access their files and data on both devices without any hassle. Utilizing the right file transfer method ensures a smooth, trouble-free experience.
By exploring and utilizing the different file transfer options available, users can discover the most efficient and convenient methods for their specific needs. This will ultimately enhance their overall experience when transferring files between iPhones and Macs.
